by Zach Smith | Apr 23, 2016 | Care, Flowering, Potting, Privet, Styling, Wiring
 I showed you this Chinese privet, Ligustrum sinense, earlier in the season. I collected it in Winter 2016 and direct-potted it into this nice Byron Myrick oval. Because it had a complete trunk, nice movement and taper into the apex where I knew I could grow a crown in no time, there was no reason not to go straight to a bonsai pot.
So here it is, all flush with new growth. Time to do the initial styling before the branches get too stiff (privet branches get way too stiff to bend if you don’t catch them while they’re young and tender).

It’s best to work from bottom to top when you’re styling your trees. While this isn’t a hard and fast rule, it does make branch selection and placement easier.
My first step was to clear unneeded growth, once I had selected my first two branches. Since I want to wire branches in pairs, whenever possible, I work my way up the tree picking branches two at a time. This helps tremendously.

Now the first two branches are wired and positioned. There are two benefits in doing this: one, the branches are where they need to be based on the intended design; and two, with these branches in position it’s easier for me to select and envision the positions of the next two branches.

Two more branches are wired now, a back branch and one coming toward the viewer. Regarding the latter, you need branches that move into the viewing zone, however, these are typically not found until you get more than halfway up the tree. Remember, you want the first third to half of your trunk to be visible to the viewer. At that point, you want foliage crossing the trunk. A front-pointing branch is one way to make this happen. In my privet, I’ve got a branch in just the right spot to make this happen.

Now the next two branches are wired. Both of these are in the back of the tree. This helps with the illusion of depth. Bonsai are three-dimensional objects, so without branches emerging all around the tree you run the risk of destroying the illusion you’re trying to create.

After a little more editing and wiring, the finished result. This tree now has its basic structure in place. The next step is to let it continue growing, which will thicken the branches and start the ramification process. I’ll need to remove the wire in about two to three weeks, then wire again for the summer growing season. By fall, this will be a presentable Chinese privet bonsai.
The trunk base of this tree is 1.5″. Finished height should be about 16″.
This tree is available at our Chinese privet bonsai page.
by Zach Smith | Dec 27, 2015 | Care, Privet, Pruning, Wiring
 I happened across this Chinese privet, Ligustrum sinense, while walking my property today. The base looked really good, and I thought the two trunks went well together. Better still, it came out the ground in under five minutes.
Here’s the tree with its rootball. Privets are shallow-rooted, so you never have to go too deep to free them from the ground. There are typically numerous lateral roots, however, and privet sapwood is remarkably tough. But the cordless reciprocating saw still makes short work of them.
Take a close look at this tree, as there’s a good lesson worth remembering when you select the material you plan to work on. The left-hand trunk tapers all right up to about midway. Then it flares back out. This is not suitable for bonsai design, so there’s no choice but to chop the trunk back. The right-hand trunk tapers pretty well, but notice the long straight section. I’ll guarantee you that if I don’t cut this trunk back, your eye will be drawn to it like a magnet as you view the developing/developed tree. Simply put, it’s a flaw that I have to deal with now; otherwise, there’s a second chop in this trunk’s future.
 Now I’ve got the roots washed and cut back, and both trunks chopped. It doesn’t look like there’s much left to this pre-bonsai specimen, but I’ve done the work today that needs to be done in order to allow for proper design of the tree over the next few years.

Another possible front. The base looks better from this angle. The secondary trunk goes toward the back of the tree, but I think this can be dealt with as the new leaders are developed. In fact, it might make for a better design. It’s not always easy to see your complete tree when you first collect or buy a piece of material that’s in a rough state as this one is. The good news is, you don’t have to. I plan to let this tree come out in spring, select my two new leaders and then wire and shape them. By the end of the 2016 growing season, I’ll have a much better idea of my final design.

The tree potted in a nursery container. I sawed it very flat, to make placing the tree in a bonsai container much easier when the time comes. The trunk base is 2.25″ and it’s about 6″ in height to the chops.
by Zach Smith | Dec 23, 2015 | Care, Flowering, Potting, Privet, Pruning
As you know, Chinese privet, Ligustrum sinense, is one of my favorite species to create bonsai out of. They grow fast, the leaves are naturally small, and they bloom readily in a pot. Because they’re naturalized where I live, I have ready access to material – even on my own property from volunteer seedlings.
When I cleared off some property a couple of years ago to expand my nursery (and my backyard), there were a few specimens of privet “hanging around” a few of the stumps that we left. If you’ve ever tried to recover a piece of material that’s snuggled into an oak root, I suspect you gave up after some frustrating poking, sawing and levering. The piece below was one of those cases: I first tried to coax it out from its protective oak stump last year. It didn’t budge. But I knew that time was on my side, because the stump was going to rot.
Today, for some reason, in the waning light two days before Christmas, I decided to have another whack at the monster – this one has a root base is 9″ across from trunk to trunk and 6″ deep. The tallest trunk is 14″ to the chop.
 I snapped this photo before the darkness overtook me. Everything you see is connected. The trunks have some nice taper and interplay. And I know exactly how I’m going to grow the crown. This will be about a three-year project.
The nebari is awesome from the front side. As you might expect, the back was curved to fit its previous home and as a result there’s no rootage there yet. It should grow on its own in the pot, however.
by Zach Smith | Nov 25, 2015 | American Elm, Care, Elms, Privet, Pruning, Tools, Wiring
Winter is no excuse to stop practicing our bonsai scales. By this, of course, I mean the continued practice of techniques that help us get better and better at designing and developing our bonsai. And along these lines, I’m a big proponent of practicing on less than stellar material. Why? Well, when you get down to it there’s never been a bonsai that didn’t start out as less than stellar material. All of our trees have to grow, get whacked back or chewed on, suffer drought and/or deluge, and one day they look like something we really want on our bench. In the meantime, however, there are those little trees that won’t make you look twice. These get the “treatment.”
 Here’s Exhibit A, otherwise known as less than stellar Chinese privet, Ligustrum sinense. This isn’t a terrible piece of material, but it does have its issues. The biggest one is the fat base with the shoulder, that narrows into the main part of the trunk too quickly. Now, this is a nice practice piece. There are problems that can be solved, and when they are the material will be much better.

A few minutes later, the overlarge base has been whittled down so it looks like part of the tree. This is very straightforward, but I can’t tell you how often I’ve had students or demo observers amazed when I attack a piece of material so aggressively. To be sure, not all species appreciate rough treatment. But once you start learning the individual habits of different species, especially the types of work you can safely do at what times of the year, you can get actually away with a lot.

The next problem with this tree was the odd branch sticking straight out near the original chop. A quick whack and some nibbling with the knob cutter solved that problem.

And finally, I removed everything that didn’t look like a future Chinese privet bonsai, wired and positioned the branches.
Hey, it’s not awesome material but it’s a lot closer to stellar than before. This one can go into a bonsai pot next spring.

Just so you know I know what really nondescript material looks like, here’s Exhibit B, an American elm, Ulmus Americana, that began as a single trunk nondescript specimen a few years ago, after which it dried out and died back to the base (at which point I threw it on the discard pile, thinking it was totally dead), after which it sprouted two shoots from the base and I felt compelled to save it. This is the end of year two of the regrowth of this tree. There’s really not much to it. But as you develop pre-bonsai from seed or cuttings, you learn various techniques for developing trunk size and character. In the case of this specimen, I need some movement in the swelling trunks. So I put some fairly heavy gauge wire on each trunk.

I didn’t try anything fancy here, just put a little curve in each trunk. Notice, however, how I’ve started this design. The trunks move in harmony with one another. The left-hand trunk is destined to be more upright, which means the right-hand trunk needs to sweep a bit farther to the right. This is what would happen in nature, as the right-hand trunk needs sufficient light to thrive.
The wire on this little tree will need to come off next May at the latest. I expect pretty rapid swelling when growth gets underway in spring.
For those of you wondering, Good Boys Do Fine Always is a mnemonic that helps music students remember their notes. That’s right, I was a band geek many decades ago.
by Zach Smith | Jan 7, 2015 | Care, Chinese Elm, Elms, Potting, Privet, Soil, Watering, Wiring
From time to time I’m approached by someone who has become excited about bonsai and wants to get into the hobby. Sometimes they’ve been given a bonsai as a present, sometimes they’ve bought one from a roadside vendor or home improvement store – a “mallsai,” as it’s called. From such humble beginnings often comes a fiery passion. All too often, however, the initial surge of excitement crashes headlong into reality as the new enthusiast discovers that bonsai is one of the most complex simple things you can do. Many quit when their tree mysteriously dies; I mean, if you don’t know why, what’s the point in repeating the disappointment and especially when it costs you money to boot?

A Chinese Elm Starter Bonsai
There are key factors the new bonsai enthusiast must know and apply when starting out. While it’s not possible to guarantee success – everyone’s situation is a little different – understanding these factors literally forms the foundation of everyone’s ability to grow miniature trees, from the greatest master to the rank amateur. In fact, it’s not an exaggeration to say that until you truly understand them, you are destined to fail.
Here are my five fundamental bonsai factors for the new enthusiast:
1. Every plant is an outdoor plant, even those that may be kept indoors for a short period of time.
Many a new bonsai enthusiast is attracted to the idea that bonsai are indoor plants, and they envision them sitting on a shelf in the living room. You have to forget this idea. Yes, I know, you’ve read on the Internet about indoor bonsai and there’s lot and lots of information about how to do it. To be sure, many bonsai experts are able to maintain bonsai indoors. You are not an expert (yet). So forget this idea.
2. The most common cause of bonsai mortality is drying out. What’s extra sad about this problem is sometimes the tree dried out before you even got it, but it’s a juniper and they die very slowly and remain green right up to the end. (Not all “mallsai” are junipers. Junipers are popular in the commercial trade because they look like little pine trees, they’re hard to kill and stay green even after death, hence they can be shipped across the country and sold to unsuspecting buyers.)
The tree above is a starter Chinese elm bonsai. If you’ve read my article on Chinese elm as one of the best bonsai trees for beginners, you know how I feel about the horrid “S-curve” Chinese elm. They are the bane of the commercial bonsai industry. If you’ve ever seen one, compare it with the tree above. Though very short, less than 10″, the tree has a solid design and is well on its way to being a small work of art.
3. The second most common cause of bonsai mortality is suffocation of the roots, due to poor soil. Bonsai are not houseplants, which are potted in a completely different type of soil than is used for bonsai. Unfortunately, all too often beginner bonsai, or “mallsai,” are potted in commercial potting soil. This is done sometimes to overcome the likelihood that watering of the tree will be spotty at best during the period of time between creation and retailing to you.
If you have a “mallsai,” one of the first things you must do is understand what’s going on in the pot. Check the soil surface. If it’s rock solid and you can’t move any of the soil, then you have one of the dreaded glued-on-rocks impervious soil surfaces. Watering is impossible. If you have this, your first order of business is to break the entire surface layer off and discard it. Underneath you should find some sort of potting soil, hopefully. Whether or not you had the glued-on-rocks problem, your next order of business is to gently stick your finger into the soil to gauge how much moisture is present. If it’s soggy, you have a problem. Let the soil dry out for a couple of days before watering. If the soil is dry, water thoroughly and watch to see if the water drains out. If it drains well and quickly, you’re in good shape. If it pools and drains slowly or not at all, you have a problem which must be addressed as soon as you can. The fix is beyond the scope of this article, but you can email me if you find yourself in this situation.
4. Learning bonsai involves killing trees. If your first bonsai does not die right away, this does not mean you’re a bonsai expert. It just means you haven’t suffered your first loss yet. If you want to practice bonsai, you have to be prepared to lose trees along the way. Everyone loses trees, even the greatest of the masters. It’s part of the price you pay for the sublime enjoyment of one of the highest of the arts. So get as many trees as you can comfortably fit into your bonsai space and maintain, given your lifestyle. More is better. You learn more by doing more. If you only have a few trees, you’ll tend to overwork them and this is just as harmful as letting them dry out. Overload yourself and your bonsai time.
What’s the average life expectancy of a bonsai? Over the long haul, you an expect your average tree to live between five and 20 years. I know this may sound a bit morbid and perhaps even discouraging, but bonsai exist in a very limited space and as a result are at enhanced risk and exposure. Drying out, root suffocation and freezing are the biggest risk factors and never go away.
That’s the bad news. The good news is, you can learn the skills needed to style and shape a bonsai to “completion” in as little as three years. In five or six years, most average size bonsai are fully developed and showable (if you should choose to pursue showing your work). By the time ten years have passed, barring issues along the way, your trees should be outstanding examples of the art if properly trained and maintained.
5. Take as many classes as you can, with teachers who know sound bonsai techniques. Sooner is better. Very few individuals are successful on their own, without getting advice from some source. I did well with books and magazines back in the day, but frankly I would have been better served if I’d learned directly from someone who’d already made the mistakes I was destined to make. It’s water under the bridge for me, but it needn’t be for you. Find someone who teaches, and first learn techniques. Then practice them faithfully, on every tree you work on.

A Chinese privet bonsai, shaped and styled using time-tested techniques.
Why techniques? Bonsai is a lot like music. The finest musicians play scales daily. Why? Because scales are the fundamentals of the art of music, and fundamentals must be practiced or you won’t get to the art part. With bonsai, wiring, pruning, shaping, root-pruning, and so on are the scales and must be practiced, otherwise you won’t get to the art part – guaranteed.
This last tree is an example of a bonsai just a year in training from a mere trunk. While I knew clearly the basic style of tree it was going to be, I had no way to know the “details.” But I didn’t need to. I simply wired and shaped the branches, and made sure they were moved into the appropriate spots. All strictly based on technique. Even at this stage of its development, I felt there was art in this specimen.
If you’re a new bonsai enthusiast, you have a challenging and exciting road ahead of you as you learn about bonsai. It’s a journey we all take, and the journey’s the thing. But I hope these tips can help you avoid a few of the pitfalls along the way.
Was this article useful to you? Let me know by leaving a comment below. I’d love to hear from you.
by Zach Smith | Jan 4, 2015 | Care, Privet
A species I’ve specialized in over the years is Chinese privet, Ligustrum sinense. Though many here in the South consider privet a noxious weed, it is in fact very well suited to bonsai culture. It takes to container life well, is drought and disease tolerant, and has the requisite small leaves and compact growth habit the bonsai enthusiast looks for. As an added feature it blooms in the pot, and you don’t have to let it go wild to get it to flower as with crape myrtle.
In 2014 privet was off my radar, as I focused on other species along with nursery construction, etc. With the new collecting year in full swing, I’ve found myself gravitating back toward this old favorite.
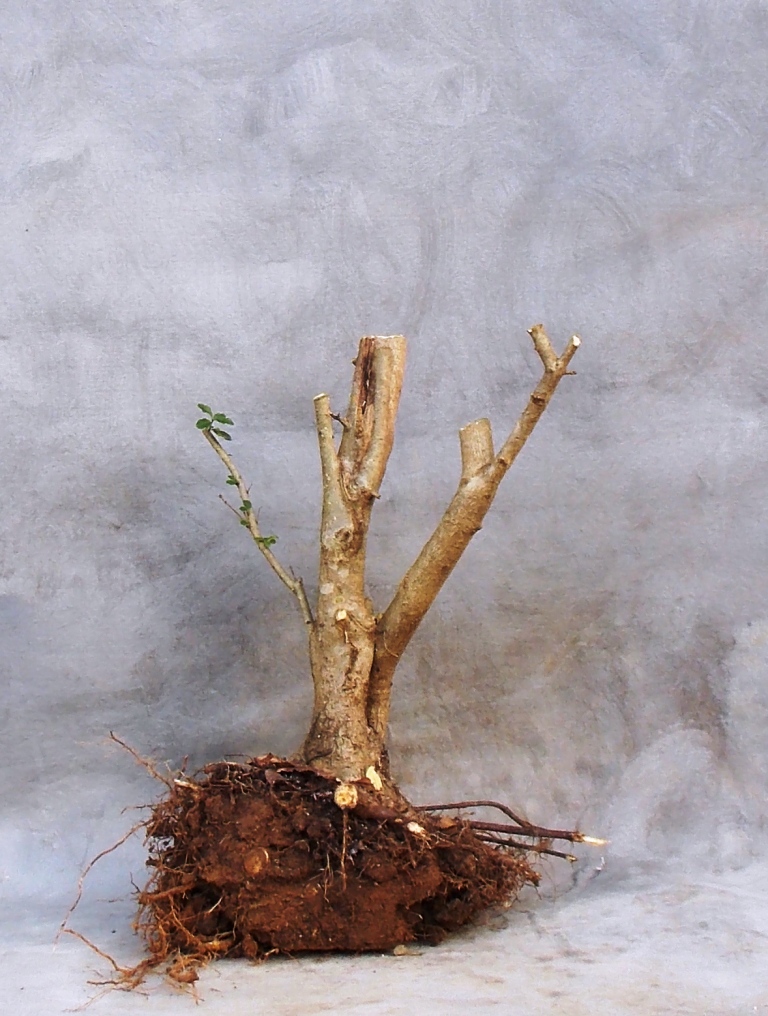
 Here’s a newly collected privet. Some of you must be thinking, “What the heck is this?” Well, one thing about Chinese privet is it grows super fast, so you can literally pot a “stick” collected from the wild and grow the entire branching and crown structure of the tree in a couple of years. As I always tell my students, if your trunk is sufficiently thick and it’s got nice character, movement and taper, the rest can be grown in a bonsai pot. This includes roots. Privet usually comes with ready-made surface rootage, so you don’t need to spend any additional time on this chore.
I have no idea where this privet will bud in spring. I suspect I’ll have my choice of new shoots for branches. But the beauty of the art of bonsai is you adjust the design to fit the tree’s desires. I’m a big proponent of letting each tree decide what it wants to be. This way you avoid “cookie cutter” bonsai, and no two are alike. Isn’t that the way it should be?
If you decide to grow privet as bonsai, you need to be aware of one key feature of the species: it must be root-pruned annually. Privet roots as vigorously as crape myrtle and willow, so postponing the annual chore can lead to stunted growth and weakening of the tree.
 Oh, here’s another privet “stick in a pot” and the same tree a year later. I think you can see why I don’t have any worries over the specimen above.
Watch for the “stick” above to be available this coming summer. Trunk base is 2″ and it’s about 10″ to the top chop. Isn’t that Byron Myrick oval superb?
Let me know what you think by leaving a comment below. Have you ever worked with Chinese privet before? If so, what did you like about it?
