by Zach Smith | Oct 10, 2015 | Care, Elms, Hawthorn, Potting, Pruning, Soil
Water-elm, Planera aquatica, is one of my big-two bonsai species along with bald cypress. I’ve probably worked on more water-elms than any other species, and I may very well have worked on more than anyone else in the art. I’ve written on more than one occasion about water-elm collecting season, which is typically July of each year for me. Most of the specimens I’ve acquired have been collected in July. I have had occasion to collect in August – successfully, I might add – and even in January. But I recently learned that it’s possible to collect the species in October. Because my August success rate this year wasn’t all that great, I decided it was time to push the water-elm collecting envelope and see what happens.
 This one came with a soil ball clinging to the roots. I don’t always get a soil ball – much less than half the time, in fact – but I’m always glad when it happens. If you look past the grass you can see the trunk base I saw. Definitely a worthwhile piece of material if it lives.

With all of the native soil washed off, you can see all the nice roots that came with this one. When I collect trees I’m primarily interested in the trunk. Roots can be grown pretty easily, and the whole branch structure has to be grown almost every time. It’s the trunk, and especially those with age and character, that are worth the hunt.

I included this photo to show you one of the reasons you have to be very careful with certain elm species. On both American elms and water-elms, the bark will peel easily on branches/sub-trunks you’re cutting as well as chops and, perhaps most significantly, roots. Even with sharp tools you have the potential for this to happen. If it does, do your best to do as I did in this case, peel away the bark along the wood you’re discarding. Then you can come back and cleanly cut the strip of bark.

Now everything’s cleaned up and I’ve made the final cut of the trunk to the length I want. The roots are cut flat and trimmed to fit, ultimately, the size bonsai pot this tree will reside in.

Potted in a nursery container. As always I’ve buried the roots deep enough to prevent their drying out.
The trunk base of this specimen is 3″, and it’s 13″ to the chop. The trunk character is really nice.

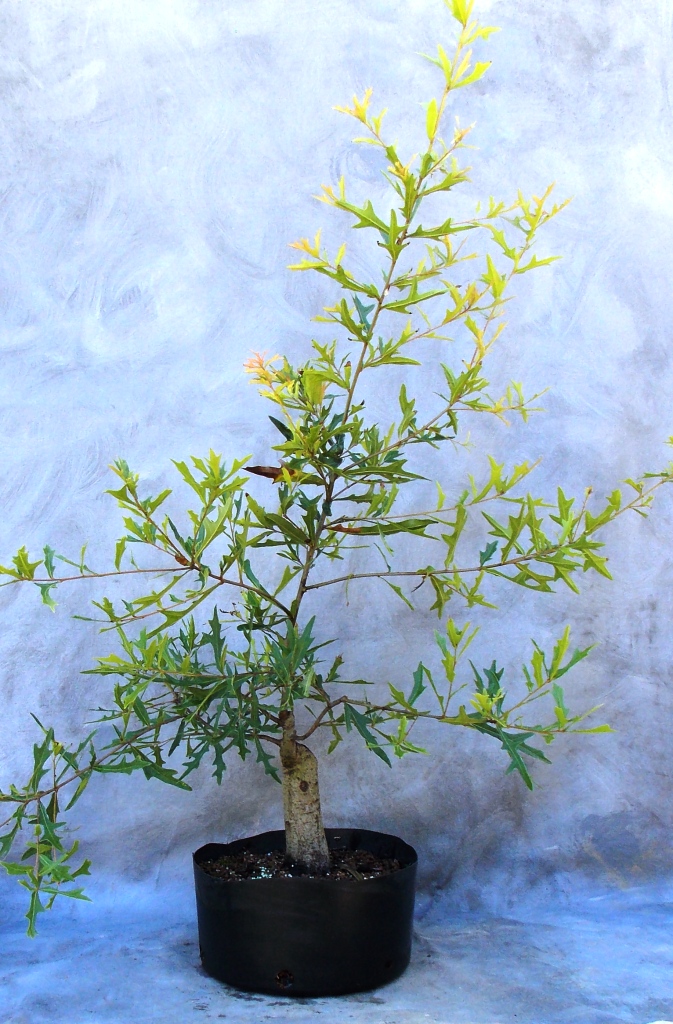
So, what with all the envelope pushing I got a wild hair and decided to find out if hawthorns can be collected in October. This is a nice old riverflat hawthorn, Crataegus opaca, with a 2″ trunk base.

More good luck with roots, as you can see. This one has a fine radial root system.

And snugged into its pot until next spring. The angle of the photo doesn’t allow the taper to show as well as it could. The base of this tree is 2″ and the diameter of the chop is 1″, which is the ratio you need. The height to the chop is 18″ from the soil surface. I’m thinking it could be chopped again by 3-4″, but this decision doesn’t have to be made right away. Once your hawthorns are recovered from collecting you have a lot of latitude in working with them.
by Zach Smith | Oct 3, 2015 | Care, Pines, Potting, Pruning, Wiring
You’ve seen this loblolly pine, Pinus taeda, before. I first potted it in 2013 when I started working with the species. As you may recall, I’ve noted before that I’ve never had any luck with Japanese black pines, despite the fact that they seem very well suited to the climate of the Deep South. I love pine bonsai, so I figured that if I couldn’t grow loblolly pine then it must surely be me and I’d need to give up forever. So with a few specimens in hand that I’d gotten back in 2012 I went to hacking and wiring and in the case of this tree, potting. It was a pleasant surprise to me that loblollies seem to really respond well to bonsai techniques.
 This is a photo I took of this specimen in October of 2014. What I saw here was a tall pine with its foliage mostly concentrated in the upper reaches of the tree. So I wired some movement into the new apex and wired the branches downward, giving them a trim in the process to bring them closer to the trunk.

Here’s a shot from today. You can see the development of the tree in the past year. I let a leader run in the apex to thicken it so it can support the branching I need. I’ve pinched the growth in the branching along the trunk in order to keep it from getting too rangy. I want this tree to give the appearance of a classic tall pine. To do this, I can’t let the branches get too long.
You can see in this photo that I wired the tree to the pot so it wouldn’t tip over. I cut the roots back hard when I potted the tree. In the process, I learned that the root system wasn’t as stable as I’d like. So the wire was a good way to keep the tree upright until the roots got stronger.

In this photo I’ve removed the guy wire – the roots are nice and strong now – and also pruned back the apex. Now I’ve got the profile of this tree back where I want it. It looks more believable.
The left-hand branch remains overly long and will need to be brought back in next year. I have to be careful when I do this. There’s a small bud halfway back on the branch, but I can’t cut to it until next spring after the candles begin to extend. Otherwise I risk the entire branch.
Of course, in studying this tree it occurs to me that the left-hand branch may need to come off altogether. I’ll probably wait and see how it looks once I’ve chased it back. If that doesn’t make the tree look right, then I can take the branch off.

Finally, I put some wire on one of the smaller branchlets on the lowest right-hand branch. I think this makes the silhouette look much better.
I refrained from doing an excessive amount of pruning on this tree in 2015, as I needed the branches to gain strength. It’s for this reason the needles are a bit long. Loblolly has at least three rounds of growth in each season, which allows you to get must faster ramification and needle length reduction. I expect to be able to put some effort into these techniques in 2016.
by Zach Smith | Sep 20, 2015 | Care, Potting, Pruning, Sweetgum, Wiring
 I collected this sweetgum, Liquidambar styraciflua, in 2011. In 2012, with a season of vigorous root growth behind it, I decided to go ahead and put the tree in this very nice Paul Katich pot. The reason I felt comfortable doing this is with the trunk already “developed” naturally, all I had left to do was build the branch structure. This is easily done in a bonsai pot. I had no particular need to thicken the trunk of this tree, and it already had nice taper from the base to where I chopped; finishing out the tapering into the crown would be a snap.
As the new growth emerged on this tree, pretty much all I’ve got is a few tender shoots I’ve wired into position (the lowest branch came with the tree; I decided to keep it to get a head-start on at least one branch).
 Two months later, check out the progress. Sweetgums grow fast! This is especially true with newly collected specimens. They want to regain their strength in order to get big and tall, just as they’re programmed to do. So they’ll push a lot of growth with this goal in mind. It’s our job to keep the growth in check and direct it as needed to build a tree structure.

Fast-forward to May of 2013, and I’ve got a complete set of branches. To be sure, there’s a lot of work ahead for this specimen. It’s one thing to have new branches that have been created from strong one-year shoots, quite another to have the secondary and tertiary branching vital to making a potted tree a bonsai. Nevertheless, this is a pretty satisfying stage of development for a tree only two years out of the ground.

Now we see the tree in Fall 2014. With another year of development behind us, the tree is starting to get some ramification. With sweetgums, this is a somewhat time-consuming process due to their natural growth habit. New shoots emerge as clusters of leaves with a central growing tip. While it’s all right to pinch out the growing tip on a developed branch/branchlet, you don’t want to do this during the primary development phase on any branch. You allow the shoot to extend for a bit, then pinch out the tip just before your internodes get too far apart. This allows for new buds to emerge from the leaf axils along the new branch.
 Here’s the tree in May of this year, after I defoliated it in preparation for repotting and root work. If you compare this photo with the one just above, you can clearly see the tree is building ramification and taking on more and more the appearance of a real tree – a real bonsai is emerging. I’m getting closer and closer to that point where I can focus on refinement and, as needed, renewal pruning.
 And a final shot from today. If you look closely you can see an issue with this tree that I’m dealing with: the sole right-side branch in the middle of tree weakened and won’t likely make it to 2016. To compensate for this I’ve got two adjustments in the works: I’ve wired down a branch higher in the apex, which looks like it’ll give me the balance I need; and there’s a new shoot emerging roughly halfway up the trunk on the right-hand side. I’ll let this shoot grow out next year to gain strength, wiring it into position.
You’ll find it’s not all that uncommon for your trees to lose a branch over time. The true artist is prepared to redesign in order to compensate. And quite often, what comes from a redesign is better than what you started with.
Let me know what you think of this tree. I’m really pleased with how well it’s developed.
by Zach Smith | Sep 12, 2015 | Care, Elms, Potting, Pruning, Water Elm, Watering, Wiring
I’ve mentioned before that one of the fall chores we can do that has a key effect on how quickly our bonsai develop is fall pruning and wiring. While we can’t expect much growth on our trees at this time of year, we can make and implement vital design decisions. Now, there are certain chores I don’t recommend in the fall. An example is trunk-chopping. The reason I don’t recommend this is the tree responds according to its “programming,” meaning it wants to replace the trunk and foliage mass you’ve removed. New vegetative shoots will do their best to form and grow out. This is certainly well and good, but all too often you run headlong into your first cold snap which means the new shoots don’t have time to harden off. If they subsequently get killed off by cold weather, your tree can easily suffer dieback.
 I collected this water-elm, Planera aquatica, in August of 2014. It sprouted just a few weak shoots near the base a few weeks after collection, but that was it. I figured the tree wasn’t going the make it, but I also realized that the collecting season had been delayed last year just as this year’s was. There wasn’t really any reason to assume the tree had dried out, since I take great pains to seal up my trunk chops. So I left the tree alone, and sure enough it came out strong this past spring. I ultimately decided to keep this tree, considering how many I had lost in Winter 2014.
This first photo is from May of this year.

A month later I decided to do the initial wiring and pot the tree into my vintage Richard Robertson oblong lavender pot. I felt the elongated pot matched up perfectly with the tall, graceful trunk. The tree has a tremendous flaring base with great surface roots, which is about the best start for a bonsai you can expect.

I’ve been practicing one of my key training techniques, benign neglect, on this tree for the past three months. Aside from unwiring branches to keep the wire from biting in, I’ve only fed, watered and kept a casual eye on the tree. It’s done the rest. What a wild result, eh? But this is just what the bonsai artist needs in their trees that are under primary development.

I’m posting this close-up so you can see how quickly the new leader has thickened this year. From trunk bud to 1/2-inch diameter in a single growing season. The secret? Wire a little movement into it and let it grow!

And here’s the tree after wiring and pruning. I took off a good bit of the leader, but refrained from cutting back too far since I won’t get much more growth this year and the shoot is still very young. I’ll cut it back harder in spring and wire up a new leader in order to ensure the tapering is done right.
And that’s a year in the life of a (new) water-elm bonsai. This tree will be showable in two more years.
by Zach Smith | Aug 30, 2015 | Care, Elms, Potting, Pruning, Wiring
In my opinion, the pursuit of bonsai can be roughly categorized along two lines:
- One is the “any old tree in a shallow pot that’s been trimmed up” approach to the hobby (I emphasize the word hobby to make the distinction between this concept and true art, which we should be pursuing). This is, for lack of a better term, the “commercial” bonsai industry. If your bonsai comes from one of the huge retail purveyors of ornamental plants (who shall go unnamed so as not to get me into trouble), or from the roadside vendor in the ubiquitous white van, then you’ve got one of the “undesigned” “bonsai” we’ve all encountered at one time or another. They can’t help but look sorta kinda like real trees, but on closer examination and by comparison with real bonsai you come to understand the difference – though when first starting out, you may not know why.
- The second line of pursuit is, frankly, the only one I care about. Bonsai, done properly, is high art. It’s my opinion that even the rookie can achieve some level of artistic success in bonsai by simply learning and practicing proper technique. This has been my own approach through the years, and I’m often pleased with my results. But more so than that, I have a deep desire to get to a presentable bonsai in the shortest time possible. What’s more, I really enjoy helping others do exactly the same thing. So I’ve devoted quite a bit of time on this site in trying to convey what I’ve learned through the years that can help you get to your own goal as quickly as possible.
To that end, I want to show you just how possible it is to begin with pretty nondescript material and actually create a presentable bonsai in as little as a single year.
 Here’s a young hackberry, Celtis laevigata, that I thought had a nice tapering trunk when I got it. Pictured in January of this year, there’s really not much more to it except for a few branches. But if you strain just a little and use your imagination, there might just be a tree there … some day.
(Of course, you may be thinking, “You gotta be kidding!” and I wouldn’t blame you.)

The tree came out in April, and I decided it would look good in this nice Chuck Iker round. Of course, it still takes a great deal of vision (experience?) to see a bonsai in this potted up material. What makes the difference is that I actually have a design plan. I know that given the size of the trunk and height of the tree, I have to pay particular attention to perspective and proportion. Because this is a slender tree with a not-so-fat trunk, I have to maintain careful control of the silhouette. If I don’t, it’s just going to look like an immature sapling. Remember, I want it to look as old as possible.

Here’s the tree just over two weeks later. While there’s more growth on it, there’s not that much more “bonsai” in it. The gulf between potential and bonsai is simply too great at this point.
So, what to do? That was really easy, and it’s a lesson I try to teach all of my students. When you run out of stuff to do to your bonsai that makes it better, stop doing stuff to it! There really is nothing like benign neglect in bonsai, once you’ve learned how to practice it. That means you don’t get to ignore your trees for an entire growing season, it just means learning how to know when to put a tree aside and let it alone for weeks or months. To be sure, you’ll monitor all of your trees daily during the season. You’ll water daily. You’ll feed as often as called for, depending on your choice of fertilizer. You’ll weed the pots. You’ll trim, pinch or shear from time to time. But there will be long stretches where you must leave each of your trees alone once the watering is done.
 Between late April and late August, I did nothing to this tree besides watering it each day (the lazy man’s way – my automatic watering system did the work for me). It sat in a semi-shady spot, growing however it was willing to grow. I diligently avoided dragging it out of its hiding spot and imposing more “work” on it. It just wasn’t time.
Today I took a peek behind the other bonsai that was hiding it, and what do you know? This tree has really done its thing in the 2015 growing season. In fact, I think I’m safe in saying this fairly common piece of material has actually become a presentable bonsai all in a single year. A little wiring and trimming today was all I had to do.
To be sure, not every piece of material you work on will be quite so cooperative. But you may be surprised at how good you get in making this sort of result happen in short order, with just a little practice.
by Zach Smith | Aug 29, 2015 | Care, Oaks, Potting, Pruning, Vines, Watering, Wiring
Do those two words actually go together? Can you do anything in August besides water your trees and watch them endure the heat? The answer is a qualified yes. To be sure, you don’t want to go root-pruning and repotting your deciduous trees in August. Though I don’t grow them, I understand junipers can be worked on in August. But in the part of the bonsai world I inhabit, there are limited things I get to do – but very important things, nonetheless. I can do a late summer wiring of trees I unwired earlier in the summer due to swelling of branches. I can do some pruning of overlong branches. I can cut back an apical shoot that has done its job for the season. In other words, I can work on the fundamental design of my trees, in anticipation of next spring.
I can even do an initial wiring, for example on this trumpet vine, Campsis radicans:
 The new tendrils have grown out and are now sturdy enough to wire. I still have to be careful when doing so, but I know as long as I don’t flex the tendril at its base I won’t have any trouble.

This was fast work, as I only had three “branches” and the new leader to wire. But this bonsai-in-the-making now has its basic shape. This is one of the really great things about the art of bonsai: making the most out of not so much. In this case, I can express an entire mature tree in nature in only four shoots.
What’s next for this specimen? It’s in the process of storing food for the coming winter. Trumpet vine is deciduous, so metabolically the plant is only “thinking” about survival as it’s going to be dropping its foliage in about six to eight weeks. As for me, my only chore is to keep it watered and watch the wire for any signs of binding (which I don’t expect).
This water oak, Quercus nigra, has really taken off for me this year. Fast growth, properly managed, is just what you want when developing your bonsai. Fast growth means fast branch creation, fast crown formation and fast ramification. In the case of this tree, I’m building it completely from the ground up so fast growth is allowing me to build taper and branching. There are two primary efforts going on simultaneously with this tree: one is creating a tapering trunk, and the other is establishing the basic branch structure as I go along. Now, with this specimen you’ll notice that my first three branches are fairly close together. This would certainly be all right for a shorter tree, but I’ve decided this one needs to be on the order of 16″ tall. Because of this, I can’t leave all of the low branches. I have to select a first branch, then prune accordingly.
 Now I have only one low branch, which is in a good position to be my first branch. It’s about six inches from the soil surface, so if my tree ends up being 16″ tall it’ll be in just the right spot.
Notice I’ve also clipped the leader. It’ll be cut back farther next spring and a new shoot selected to run wild, continuing the process of building the trunk. I left it overlong so there won’t be any risk of dieback during winter.