by Zach Smith | Aug 30, 2015 | Care, Elms, Potting, Pruning, Wiring
In my opinion, the pursuit of bonsai can be roughly categorized along two lines:
- One is the “any old tree in a shallow pot that’s been trimmed up” approach to the hobby (I emphasize the word hobby to make the distinction between this concept and true art, which we should be pursuing). This is, for lack of a better term, the “commercial” bonsai industry. If your bonsai comes from one of the huge retail purveyors of ornamental plants (who shall go unnamed so as not to get me into trouble), or from the roadside vendor in the ubiquitous white van, then you’ve got one of the “undesigned” “bonsai” we’ve all encountered at one time or another. They can’t help but look sorta kinda like real trees, but on closer examination and by comparison with real bonsai you come to understand the difference – though when first starting out, you may not know why.
- The second line of pursuit is, frankly, the only one I care about. Bonsai, done properly, is high art. It’s my opinion that even the rookie can achieve some level of artistic success in bonsai by simply learning and practicing proper technique. This has been my own approach through the years, and I’m often pleased with my results. But more so than that, I have a deep desire to get to a presentable bonsai in the shortest time possible. What’s more, I really enjoy helping others do exactly the same thing. So I’ve devoted quite a bit of time on this site in trying to convey what I’ve learned through the years that can help you get to your own goal as quickly as possible.
To that end, I want to show you just how possible it is to begin with pretty nondescript material and actually create a presentable bonsai in as little as a single year.
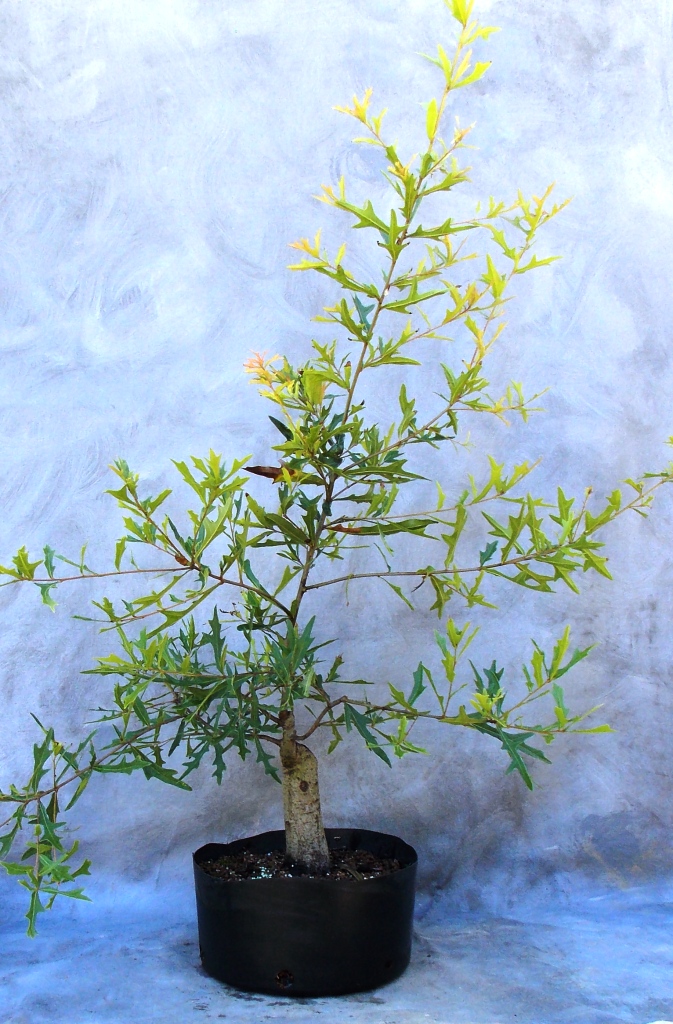
 Here’s a young hackberry, Celtis laevigata, that I thought had a nice tapering trunk when I got it. Pictured in January of this year, there’s really not much more to it except for a few branches. But if you strain just a little and use your imagination, there might just be a tree there … some day.
(Of course, you may be thinking, “You gotta be kidding!” and I wouldn’t blame you.)

The tree came out in April, and I decided it would look good in this nice Chuck Iker round. Of course, it still takes a great deal of vision (experience?) to see a bonsai in this potted up material. What makes the difference is that I actually have a design plan. I know that given the size of the trunk and height of the tree, I have to pay particular attention to perspective and proportion. Because this is a slender tree with a not-so-fat trunk, I have to maintain careful control of the silhouette. If I don’t, it’s just going to look like an immature sapling. Remember, I want it to look as old as possible.

Here’s the tree just over two weeks later. While there’s more growth on it, there’s not that much more “bonsai” in it. The gulf between potential and bonsai is simply too great at this point.
So, what to do? That was really easy, and it’s a lesson I try to teach all of my students. When you run out of stuff to do to your bonsai that makes it better, stop doing stuff to it! There really is nothing like benign neglect in bonsai, once you’ve learned how to practice it. That means you don’t get to ignore your trees for an entire growing season, it just means learning how to know when to put a tree aside and let it alone for weeks or months. To be sure, you’ll monitor all of your trees daily during the season. You’ll water daily. You’ll feed as often as called for, depending on your choice of fertilizer. You’ll weed the pots. You’ll trim, pinch or shear from time to time. But there will be long stretches where you must leave each of your trees alone once the watering is done.
 Between late April and late August, I did nothing to this tree besides watering it each day (the lazy man’s way – my automatic watering system did the work for me). It sat in a semi-shady spot, growing however it was willing to grow. I diligently avoided dragging it out of its hiding spot and imposing more “work” on it. It just wasn’t time.
Today I took a peek behind the other bonsai that was hiding it, and what do you know? This tree has really done its thing in the 2015 growing season. In fact, I think I’m safe in saying this fairly common piece of material has actually become a presentable bonsai all in a single year. A little wiring and trimming today was all I had to do.
To be sure, not every piece of material you work on will be quite so cooperative. But you may be surprised at how good you get in making this sort of result happen in short order, with just a little practice.
by Zach Smith | Aug 29, 2015 | Bald Cypress, Care, Wiring
 This bald cypress, Taxodium distichum, was one of the last two BC I collected this past February to bud out in spring. Unsurprisingly, the growth was sluggish throughout spring and into the first part of summer. It didn’t bud as prolifically as BC usually do, but it was alive from top to bottom and that was enough for starters. I’ve collected trees that didn’t start out strong, but which picked up tremendously in year two. I figured this would be one of them.
As summer progressed, I noticed that this tree was gaining strength. It’s now even got roots growing out of the drains holes. And while it didn’t have as many branches as you’d normally expect, I decided it was destined to be a flat-top anyway so it didn’t matter. Today it was time to start training this tree.

The first decision I had to make was regarding the appropriate leader for this tree. As you can see in this closeup, I have two good candidates. After studying the tree for a few minutes, I realized clearly that the best choice was the one emerging from the right-hand side of the trunk. Why? One of the key factors in bringing out the true art of your trees is drama. What this means is, the bonsai that has a static appearance does not inspire. For example, trees that completely lack trunk movement are very difficult to make into impressive bonsai. It can be done, but usually it’s by going with a broom style design (one of the most difficult to achieve). In the case of this BC, by avoiding the branch that shoots straight up from the front of the tree, I know I can make something dramatic out of this specimen.
 Here’s the tree after I selected my leader and removed most of the branches I have no use for. I’ve also wired the primary branches and the new leader. The bonsai is taking shape.

Now I’ve done the necessary bending to shape the branches and take the leader where I want it to go. Notice that my first bend in the new leader was back toward the trunk. This is exactly what needed to happen. The second bend was back in the original direction. I also twisted the leader slightly in order to allow me to wire and position the secondary leader of the flat-top.

Here’s the final result. I’ve trimmed back the low branch, left the high vestigual branch long to thicken, made an initial angle cut at the trunk chop, and done the shaping in the crown that will ultimately complete the design. I’ve deliberately allowed the leader to extend, for a taller and more graceful specimen.
I expect to add another vestigual branch or two next year, but I’ll have plenty of buds to choose from in spring.
What do you think? Do I have a nice flat-top bald cypress in the works?
The base of this tree is 2.5″, and the height to the tip of the crown is about 24″.
by Zach Smith | Aug 29, 2015 | Care, Oaks, Potting, Pruning, Vines, Watering, Wiring
Do those two words actually go together? Can you do anything in August besides water your trees and watch them endure the heat? The answer is a qualified yes. To be sure, you don’t want to go root-pruning and repotting your deciduous trees in August. Though I don’t grow them, I understand junipers can be worked on in August. But in the part of the bonsai world I inhabit, there are limited things I get to do – but very important things, nonetheless. I can do a late summer wiring of trees I unwired earlier in the summer due to swelling of branches. I can do some pruning of overlong branches. I can cut back an apical shoot that has done its job for the season. In other words, I can work on the fundamental design of my trees, in anticipation of next spring.
I can even do an initial wiring, for example on this trumpet vine, Campsis radicans:
 The new tendrils have grown out and are now sturdy enough to wire. I still have to be careful when doing so, but I know as long as I don’t flex the tendril at its base I won’t have any trouble.

This was fast work, as I only had three “branches” and the new leader to wire. But this bonsai-in-the-making now has its basic shape. This is one of the really great things about the art of bonsai: making the most out of not so much. In this case, I can express an entire mature tree in nature in only four shoots.
What’s next for this specimen? It’s in the process of storing food for the coming winter. Trumpet vine is deciduous, so metabolically the plant is only “thinking” about survival as it’s going to be dropping its foliage in about six to eight weeks. As for me, my only chore is to keep it watered and watch the wire for any signs of binding (which I don’t expect).
This water oak, Quercus nigra, has really taken off for me this year. Fast growth, properly managed, is just what you want when developing your bonsai. Fast growth means fast branch creation, fast crown formation and fast ramification. In the case of this tree, I’m building it completely from the ground up so fast growth is allowing me to build taper and branching. There are two primary efforts going on simultaneously with this tree: one is creating a tapering trunk, and the other is establishing the basic branch structure as I go along. Now, with this specimen you’ll notice that my first three branches are fairly close together. This would certainly be all right for a shorter tree, but I’ve decided this one needs to be on the order of 16″ tall. Because of this, I can’t leave all of the low branches. I have to select a first branch, then prune accordingly.
 Now I have only one low branch, which is in a good position to be my first branch. It’s about six inches from the soil surface, so if my tree ends up being 16″ tall it’ll be in just the right spot.
Notice I’ve also clipped the leader. It’ll be cut back farther next spring and a new shoot selected to run wild, continuing the process of building the trunk. I left it overlong so there won’t be any risk of dieback during winter.
by Zach Smith | Aug 27, 2015 | Care
When learning how to create bonsai, we’re confronted with some obvious questions about how to make them look right. My previous three posts covered the basics of design, mostly from the standpoint of composition and key “tricks” we use in fooling the brain. All well and good, but for those of us who tend toward numbers and technical factors as a means to the art of bonsai, it’s really important to know certain concepts and proportions that lie somewhat outside the realm of pure artistry. So with that said, here’s a listing of useful numbers and other factoids that will help you make presentable bonsai as you work your way toward true artistic expression.
- Tree size (height): from an inch tall to roughly 48 inches tall.
- Basal trunk thickness: from about a quarter-inch to the practical limit of roughly 12 inches.
- Height to basal trunk thickness ratio: 2:1 to roughly 12:1 for most styles; bunjin/literati and cascade tend to be greater.
- Foliar spread: from about half to two-thirds the height of the tree.
- Branch placement: first branch roughly one-quarter to one-third the way up the trunk from the soil; second branch on the opposite side of the trunk or (less commonly) in the back of the tree roughly 33-40% up the trunk from the soil; third branch in the back of the tree or (less commonly) on the opposite side from the first branch, roughly 40-50% up the trunk from the soil. Branches continue upward in a “spiral staircase” fashion, getting closer together as they go up the tree. Note: all of these rules are guidelines. Stick with them as closely as you can when starting out; stray from them artistically later on.
- Tree placement in pot: off-center toward the side featuring the first (lowest) branch, slightly toward the rear of the pot.
- Depth of pot: roughly the basal trunk thickness above the root crown. (Root crown: for trees with a flaring base, where the flaring roots merge into the main body of the trunk.) For semi-cascade trees, the pot is typically about three times the basal trunk thickness. For cascade trees, the pot is typically quite tall and typically several times the basal trunk thickness. Cascade pots are usually two or three times as tall as they are wide.
- Length of pot: roughly half up to two-thirds the height of the tree.
- Width of pot: for oval and rectangular pots, usually based on the length of the pot and more or less compliant with the “golden ratio” – meaning roughly 1.61 times as long as wide. So for a 9″ oval or rectangular pot, it’ll be visually pleasing if it’s about 5.6″ wide.
- Color of pot: brown unglazed is suitable for all trees, colored glazed pots work best for deciduous trees. Sometimes you have to experiment to get the pot just right. Often a tree’s pot will change periodically during its life as a bonsai.
 Here’s my nice riverflat hawthorn, about one season away from being “finished.” Let’s look at some numbers as they relate to this tree:
The tree is 31″ tall. The foliar spread is 25″. The trunk base is 3″ in diameter above the root crown. The pot is 3″ deep and 15.5″ in length. It’s glazed a beautiful green color. The first branch on this tree is roughly 25% of the way up the trunk from the soil surface. The second branch is roughly 40% of the way up the trunk. The rest of the branches are arranged more or less in a spiral manner up the trunk, becoming more plentiful as they reach the crown. The tree is potted slightly to the right of center of the pot, on the side of the first branch, and slightly to the rear of the pot.
So there you have Bonsai by the Numbers. Let me know what you think.
by Zach Smith | Aug 26, 2015 | Care, Water Elm
In Part 1 of this article we took a look at the principle of non-static (asymmetric) stability, the overall shape of a bonsai and how it conforms to a visually pleasing silhouette represented by a scalene cone. In Part 2, we explored how the bonsai artist uses perspective to create the impression of a hundred foot-tall tree in only a couple of feet, by creating trees with trunks that taper from base to apex as well as foliage masses that likewise taper. In this post, we’re going to explore the third design principle used by the artist to make a bonsai look like a mature tree in nature: how to make your tree look older than it is.
Although we occasionally get to work with material that’s actually very old, there’s no such thing as a bonsai that’s too old(!) – so we always seek the appearance of more age in our trees. This can actually be accomplished in material that’s quite young. It just takes knowledge of how to apply a few key techniques.
First of all, we need to ask ourselves what it is about old trees that make them look old. It isn’t hard to list a few things: bark; surface rootage; thick trunk; height. These are things we either want our bonsai to actually exhibit or, in the case of trunk thickness and height, appear to exhibit as our brain sees it. Because the art of bonsai is essentially the art of illusion (albeit with a real live tree), we have to learn and practice design techniques that create or enhance the illusion we seek.
Your young bonsai may not have bark, so if this is the case you’ll need to focus on the other ways of producing the impression of age. Fortunately, we always have the ability to control the relationship between trunk thickness and branch spread. This is one of the easiest ways to make a tree look older than it is. It’s also one of the most overlooked techniques.
 Here’s an example of how this technique works. This is a relatively young American hornbeam, which was much taller when first collected. The trunk base is only 1.5″ in diameter, and when collected it looked exactly like what it was, a young American hornbeam. In order to make this tree look older (and larger) than what it actually is, the first thing I had to do was chop it down which may sound a bit ironic. But this is where perspective and proportion come in.

Now compare this photo to the first one. See how I’ve brought the silhouette of the tree inward. Now the trunk base looks thicker than it really is. And the tree itself looks older than in the first shot. I’ve taken advantage of another design principle used all the time in bonsai: using proportion to create the illusion of size and, at the same time, age in a tree. This specimen is probably no more than 15 years old. But it’s well on its way to looking like it’s 50 years old or more. Had I left the branches overlong, this illusion would be shattered.
Another way to make your trees look older can only be accomplished with time – though fortunately not an excessive amount of time – and by this I’m referring to ramification. Ramification is the process whereby you force the tree to produce more plentiful but smaller leaves. Physiologically, a tree (of any size) doesn’t care how many leaves it has, it only cares how much total leaf surface area it has. Leaves produce food; food is survival. So the tree will gladly sport one giant leaf or a million tiny ones. When we grow bonsai, we’re deliberately restricting the amount of soil our trees grow in. With restricted room, the tree shifts its metabolic output to maximize its odds of survival and growth. Thus the leaves get smaller and more plentiful.
 Here’s one of my favorite water-elms I’ve enjoyed growing, unfortunately a victim of Winter 2014. If you study the tree you’ll see that in just a few years I managed to achieve a good degree of ramification – plentiful, small leaves. It took time and effort to get the tree to this point, because branch development had to take priority. But in just about four years, I had a tree that looked as old as it actually was (possibly 75 years or more).

Just to give some perspective on how this process works to produce the impression of age, here’s the same tree two years earlier. You can clearly see the earlier state of development – juvenile shoots that had developed from trunk buds. It’s certainly a given that this was an old piece of material – the age of the trunk gave that away – but the bonsai in development looks very young in this state. So I began with old material and actually managed to make it look younger. Fortunately, I was able to do some fast development to bring back the appearance of age.
Building ramification is one of the last developmental activities we do with our bonsai. As this process continues, the tree looks more and more aged – just the way we want it.